Making a Knock-Down Hutch (Chest)
Materials: Fir, Plywood, Pine (cheap wood!).
Finish: Lexington Green milk paint and linseed oil.
Making a Knock-Down Hutch (Chest)
Materials: Fir, Plywood, Pine (cheap wood!).
Finish: Lexington Green milk paint and linseed oil.
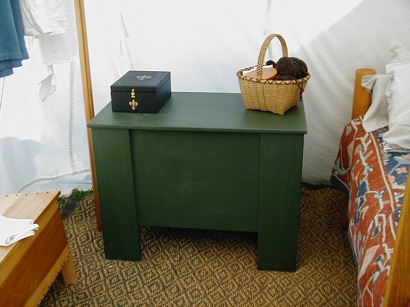
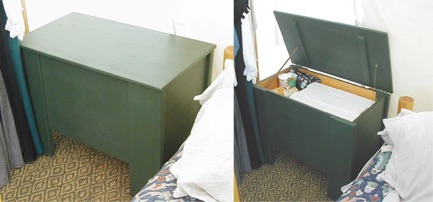
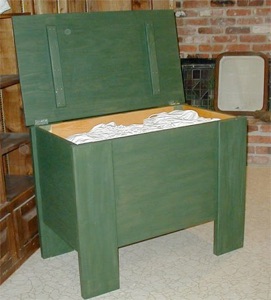
One year I decided I was tired of looking at coolers with blankets thrown over them, and in a fit of dubious ambition, undertook to build a knock-down chest of suitable size for a large cooler (and a few odds and sods to boot). The result was a passably medieval hutch. One thing I like about this design is that no plywood edges are visible, making it look more like real furniture.
This being a camp project, I wanted to keep costs to a minimum, and not being a "period" project, modern materials and expedients were just fine. I began with a quick visit to the local home supply store for the following:
 (2) 2 foot by 4 foot sheets of 3/4-inch plywood. These will make the front/back panels and sides. Birch plywood works well, but you can use cheaper B/C plywood if you wish.
(1) 2 foot by 4 foot sheet of pine laminate for the chest lid. This is a "glued up" board of solid wood; you can use plywood, but the edges will show unless you band them.
(1) 10-foot piece of 2 by 8 pine or fir for the stiles. Select pieces that are clear, with as few knots as possible.
Miscellaneous boards or plywood for the bottom (see text below).
(2) steel hinges with removable pins.
Carpenters glue, screws.
First, cut the front and end panels from the plywood sheets. From each sheet, I cut one panel 29 inches by 20 inches, and one 19 inches by 20 inches. Mine are proportioned to fit a large Coleman cooler, leaving sufficient space for the lid to open and a little extra dry storage. You can use other proportions, but in general hutches tend to be more boxy than panel chests. Cut carefully so your panels are identical and the corners are square.
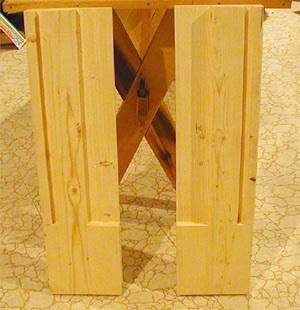
There are a number of ways you can do the following step. I used a tablesaw with a stacked-dado cutter; you can also use a router, or if you've got more time than tools, you can use hand chisels. You could also build up the stiles by gluing up 1-inch boards.
On each stile, you will need to cut a dado to hold the end panel, and a rabbet to hold the front panel. The dado should should be wide enough that the panel slides in and out easily, and no deeper than half the board thickness. Try each panel for fit before assembly, as it is harder to make adjustments after you have assembled everything. The rabbet should be just deep enough so the front panel will lay flush to the inside of the stile, and at least 3 inches wide. DO NOT make four identical stiles: the left and right sides are mirror images of each other.
Give everything a good sanding, and round off any sharp corners. Pine and fir are prone to chipping and splintering, but less so if you camfer the edges.
Assemble the front and back of the hutch using wood glue and screws. It's a good idea to counter-sink the screws so you have a nice smooth surface on the inside. Let the glue set.
Now you're ready to assemble. Slide the pieces together and make sure everything fits.
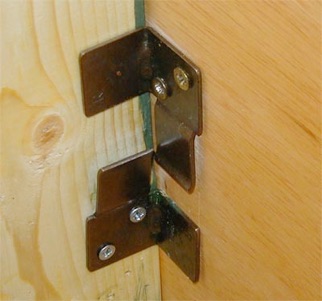
Obviously, you need fasteners to hold everything together. Terafan and Robyyan used hinges with removeable pins, relying on the bottom panel to keep everything square. . I wanted something that would add some stability, so I used sliding panel brackets, available from Lee Valley and other vendors. They also have right-angle assembly plates (cheaper!), that would serve the same purpose.
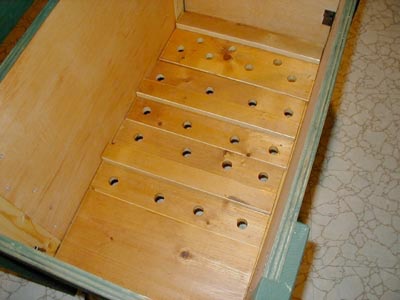
For the bottom, I used four 1 by 10 pine boards cut to length (old shelves I had laying around the shop). You could just as easily use a sheet of plywood or particle board, as no part of the bottom is visible from the outside. If you plan on using your hutch to hide a cooler, I suggest attaching some battens across the bottom and boring some ventilation holes between them. Coolers tend to sweat and by the end of a week at Pennsic things may get a bit moldy if you don't allow for ventilation.
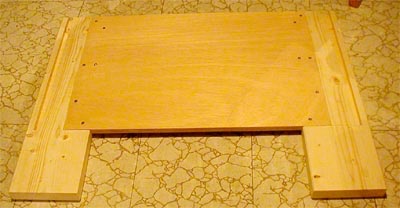
For the top, I wanted to use solid wood instead of plywood. Wide boards of glued-up stock are available at most home centers at reasonable prices. Again, try to find a piece with minimal knots and filler. I attached cleats across the inside to keep the top from warping over time. If you use plywod, run a band of molding around the edges so it doesn't look so much like plywood. Screw the hinges in place, then just knock the pins out when you want to disassemble it.
To finish the hutch, I used Lexington Green milk paint. You could try a stain, but I generally find that stained plywood looks like, well, stained plywood. Milk paint has an advantage over most other paints in that it penetrates the wood surface instead of forming a hard shell on top of it. Given that this hutch will get thrown in the truck and knocked around, the milk paint will be less prone to chipping and peeling. I cover the milk paint with a few coats of linseed oil, which mellows the color of the paint and helps provide some protection against water spots. It also helps keep the plywood from swelling in humidity.
I also suggest giving the bottom panel a couple of coats of polyeurathane. While I normally shy away from "plastic" finishes, the bottom may see a lot of moisture and needs a good waterproof finish.
Additional improvements I plan to include are a prop to keep the lid open, a stop chain to prevent the lid from falling too far open (and ripping out the hinges), and a small removable shelf so there is somewhere to set cups while rummaging in the cooler. A bottle opener mounted inside would also be helpful.
You can find Master Robyyan's original plans here:
http://robyyan.home.mindspring.com/articles/breakdown.html
And Terafan Greydragon's elaboration here:
Copyright 2009, Thomas Rettie.