Building a 16th Century Wheelbarrow
It's not entirely clear to me when wheel barrows came into common usage, but they appear in European art by the 13th century. The Chinese had wheel barrows much earlier, though their design put the wheel under the cargo box instead of in front of it. To avoid confusion, I'm using the term barrow to refer to a cargo carrier with no wheels (a hand barrow) or one wheel (a wheel barrow). For two or more wheels, I'll use the term cart. This seems to be generally consistent with period usage.
As a barrow might be a homemade sort of thing, I'm sure there were many variations in design and methods of construction. Those depicted in medieval illustrations probably make up a small fraction of what was done in period, but so far my research has uncovered the following types.
Hand Barrows
A hand barrow is a wheel-less box or stretcher with handles on either end. They are illustrated used in building construction, and by miners to remove material from the mines and for washing the ore. The hand barrow has the distinct advantage of not requiring a wheel and therefore being relatively easy to construct, but the disadvantage of needing two people with relatively strong backs.
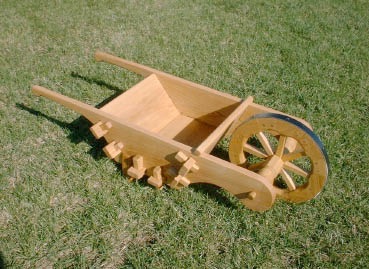
The Box Barrow
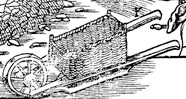
The next type is what I call a box wheel barrow. It consists of two long (5-foot +) planks, joined together by shorter planks that form a box, with handles at one end and a wheel at the other. The box may held together with wedged tenons that can be disassembled if necessary, or a combination of wedges and iron straps.
Many of these are illustrated in Aricola's 16th century treatise on mining, De Re Metallica.
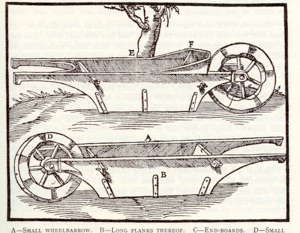
Very similar barrows also appear in the late 15th century "Medieval Housebook" of Wolfegg Castle.
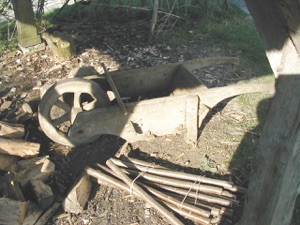
At the Weald and Downland Museum in England, they have a reconstruction of a similar type based on archaeological evidence from medieval London waterfront excavations. This example is somewhat more refined, with legs at the back of the box, but it lacks the metal reinforcement at the nose and under the box.
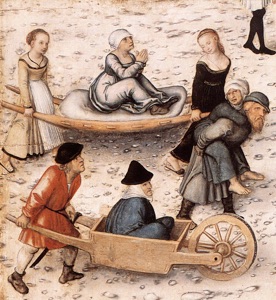
Another example can be found in details of a picture by Lucas Cranach the Elder, entitled The Fountain of Youth (1546). This illustration shows a hand barrow, and another type of box barrow where the box is permanently joined with through-tenons. The wheel has six fellies and, strangely, eleven spokes. The nails holding the tire strakes are clearly visible.
The Fenced Barrow
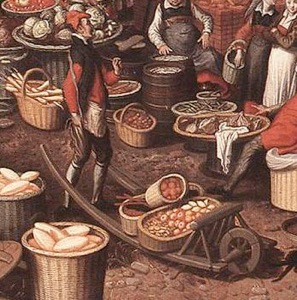
Another type I call a fenced wheel barrow. It consists of two long handles (like plow handles), joined together by slats that form a platform. At the front of that platform is something like a small fence consisting of several uprights topped with a cross post. This type is often illustrated moving bulk items, such as barrels or wool sacks. An excellent example is shown in Pieter Aertsen's 1550 market scene:
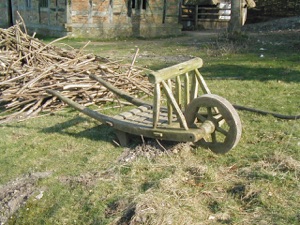
The Weald and Downland Open Air Museum
also has a fine reconstruction of this type:
Basket Barrows
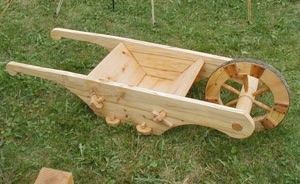
For my first attempt, I chose to make a box barrow. It has the advantage of easy disassembly and storage. A basket barrow would probably be more efficient in terms of weight, but I did not feel my basket-making skills were up to the challenge.
Part 2: Wheel Barrow: Building the Body
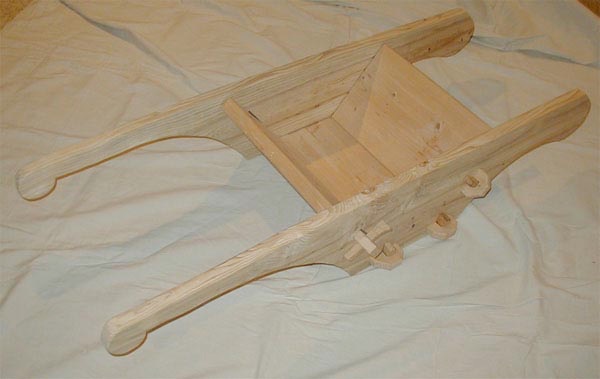
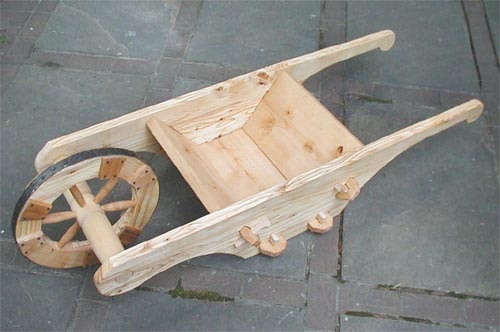
My design is a variation of the one at the Weald and Downland Museum, which is in turn after archaeological remains from the London waterfront. It's a bit different than the mining barrows from De Re Metallica and the German Housebook, being wider and joined with wedges rather than iron straps. The nose is also fuller and lacks the reinforcements illustrated on the mining barrows. In theory this barrow can be made with no metal parts. The weak points appear to be the nose around the axle, and the sides underneath the mortises for the bottom tenons. If the barrow is to be left out in the weather, the nose may split. These weak points could be addressed with metal reinforcing straps as shown on the mining barrows.
Make the body of the barrow first. It will be easier to build a wheel to fit the barrow than the other way around.
I began by cutting the side planks out of 2x12 stud lumber (available from the local home center, usually fir, hemlock, or a similar softwood). From nose to tail, the sides measure just over 5 feet. Look for a piece without cracks and as few knots as possible, especially at the nose around the axle and the handles. Hardwood would last longer, but also add considerably to the weight (and cost) of the barrow.
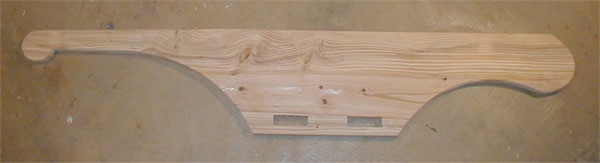
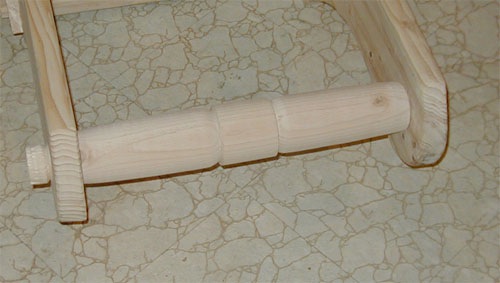
Note that the rounded ends of the handles are functional; when pulling the barrow instead of pushing it (as sometimes illustrated in period), the rounded ends give you something to hold on to.
Next, I cut the bottom and end planks. They are 25 inches long, which allows an 18-inch wide bottom plus 3-1/2 inch tenons. They are from the same 2x12 stock, though you could probably save some weight by using 1x12 stock. To avoid cutting the bottom mortises too close to the bottom edge of the side plank, I cut the tenons down to 1 inch in thickness. I then used them to mark the locations of the mortises in the side planks. They are 1 inch wide and located 1 inch from the bottom edge. A marking gage is helpful in making sure the mortises are all located in the same position on both sides. Mortising through cheap stud lumber can be harder on your tools than a clear hardwood, so I suggest scoring out the mortises on either side and then using a brace or drill to take out as much of the wood as you can. That makes cleanup relatively easy. The mortises should not be too tight, and should allow for some expansion when the wood gets wet and swells.
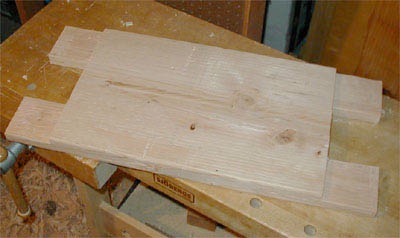
For each side board, I then put the bottom in place and used the front and end boards to find their angle relative to the bottom. I marked this angle on the bottom edge of each front/end board and shaped them down.
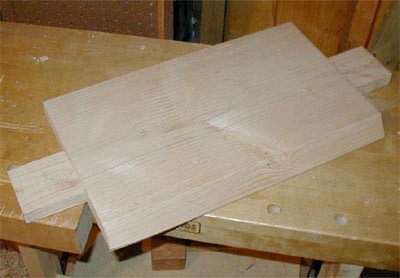
By then resting the angled edge flat against the bottom, I could locate the position for the mortises that hold the front/back in place. From there it's just a matter of boring out the mortises for the end boards and then making the mortises for the tusk tenons that hold everything together. You could probably skip the tusk tenons in the bottom plank if you wanted; many of the period illustrations only show four tusk tenons.
Part 3: The Wheel
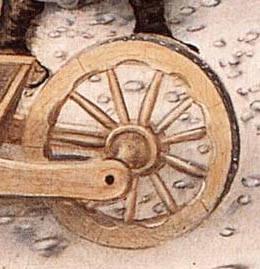
All examples of medieval wheel barrows I have found so far show the use of spoked wheels. While solid wheels are sometimes illustrated, they are usually on gun carriages or flatbed carts used for moving heavy objects (such as barrels) over relatively short distances.
A spoked wheel is made up of segments (called fellies or felloes), joined together and supported by spokes which connect to the hub. The common configurations seem to be either four felloes/spokes with a square or round hub, or six felloes/spokes with a hex or round hub. Some wheels have a single spoke per fellie, while others have two per fellie.
A simple design that continues to be used today has four fellies, four spokes, and a square hub. The spokes are rectangular in cross-section, one much wider than the other, and they go all the way through the hub, intersecting at the center. Examples of this design can be found in the Carriage House in Colonial Williamsburg, which they make for use by the costumed interpreters.
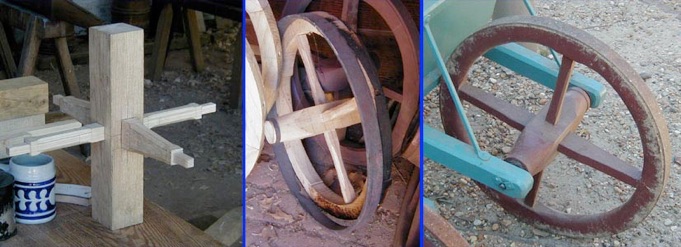
While the text of De Re Metallica describes wheels with four fellies and spokes, all illustrations show at least six. This makes for a considerably stronger wheel, both from the added support of the extra spokes and from the fellies more closely following the grain of the wood. Such wheels usually have a round or hexagonal hub.
Another variable is the presence of a metal tire. Grass and dirt are relatively forgiving on wood, but paved roads or other hard surfaces will eat a wooden wheel in short order. The ancient Greeks used iron tires that were riveted to the wheel, such as this example from the 6th century B.C. The Romans mastered the art of the heat shrunk tire -- a continuous loop of iron that expands when heated and then shrinks onto the wheel when cooled. It seems the art of the heat-shrunk tire was largely lost in Europe through most of the Middle Ages, not becoming common again until the 16th or 17th century. Through the Middle Ages, most wheels either had nailed/riveted plate tires, or no tires at all.
The presence or absence of a tire affects how the wheel can be constructed. In modern wheels the felloes just butt against each other, being held together by a heat-shrunk tire. For segmented tires (or no tires), there needs to be connection between the fellies in the form of mortise and tenon joints, lap joints, tie plates, or some such.
Being something of an experiment, I decided to go with convenience and use half-lap joints between the fellies. Lap joints are inherently weak joints, relying solely on whatever fasteners are used (glue, pegs, screws, etc.). To reinforce these joints, I added tie-plates that span the joints to provide additional support; a belt-and-suspenders solution.
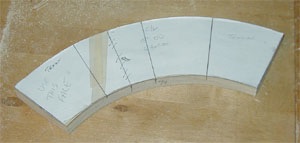
To begin, you must first decide on the size of the wheel. I chose an 18-inch diameter wheel, with 3-inch wide fellies. The next step is to make an accurate pattern for the fellies. For a six-fellie wheel, each must be 60 degree of arc, plus whatever overlap is needed for the lap joints (I added 20 degrees). The pattern marks the portion that will include the lap joints, and the center of the fellie (which receives the spoke). I created a paper pattern, then glued that on wood and cut it out. Mark the face side of the pattern, as that will be the most accurate side.
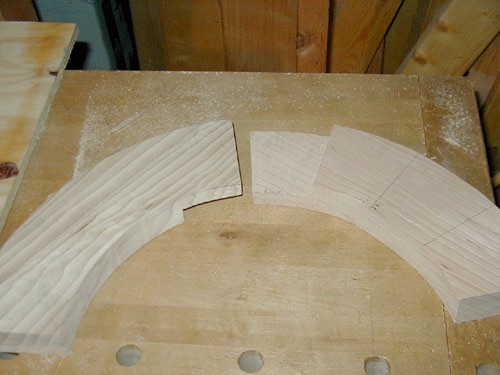
Next, mark and cut out the fellies. I used the same 2x12 stock I used for the body of the barrow (this will give you a wheel about 1-1/2 inches wide). (Clear, straight-grained hardwood would be preferable, but this was an experiment.) Place the pattern face-side down and mark the outline. The wood grain should run the length of the fellie. Cut carefully; you want the assembled fellies as close to a true circle as possible. Traditional wheelwrights use a fellie saw, which is basically a turning saw with a narrow blade. If you are using modern tools, a band saw would make easy work of it.
Once you have the fellies cut out, you will need to cut the lap joints. A scribing gage will help with accurate marks. Once the laps are cut, you can lay out your fellies and see how close to a true circle they are. They don't have to be absolutely precise (this is a wheel barrow, after all), especially if you are putting an iron tire on the wheel, but they should be reasonably close.
At this point you need to figure out the size of the hub/axle. I chose to turn a round hub, about 3-1/2 inches in diameter at the center and about 2 inches at the bearing points (the ends). There should be a well defined shoulder for the bearings. The position for this shoulder is dictated by the inside distance between the side planks of the barrow body. Ideally you want the shoulder to just rub the side planks, but be sure it doesn't bind if the wood swells.
You can mark out the points to drill holes for the spokes by making a paper strip that just goes around the circumference, then dividing it into 6 equal sections and transferring the marks to the hub. To find the length of the spokes, I scribed out a series of concentric circles on a scrap sheet of plywood: 18 inches (the outside diameter), 15 inches (the inside diameter), and 3-1/2 inches (the hub diameter). I then chose a common depth for all the spoke mortises (1 inch) and measured off the length for the spokes. You can figure this out mathematically, but I found drawing an outline of the wheel helpful to check the roundness of the assembled fellies. The spokes are just turned spindles, 3/4-inch at each end and somewhat thicker at the center.
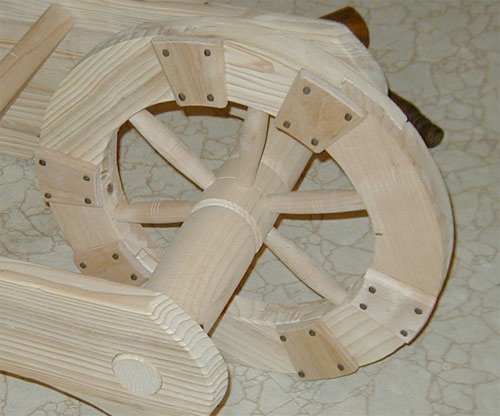
Assembling the wheel was relatively easy. I set the axle on end in a face vice, then assembled the spokes and fellies. Each fellie is glued and screwed to the adjoining fellies, and the joint covered with a wooden tie-plate.
Part IV: The Tire
Putting an iron tire on the wheel requires a minimal amount of metalworking skills. If you haven't worked hot metal before, I suggest you find a qualified teacher to give you an introduction, more for your own safety than out of difficulty.
In period, tires appear to have been made up of varying sized segments, called strakes. I chose to do two strakes, each half the circumference. Another option would be to make six smaller strakes, staggering the joints so that they do not align with the fellie joints. In theory, longer strakes might provide more strength, but as a practical matter I suspect it makes little difference.
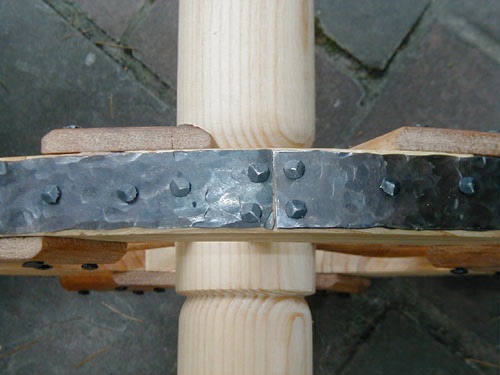
The metal stock is simply steel strapping, 1-1/2 inches wide and 1/8 inch thick, available at the local home center. To find the length of each plate, I simply ran a string around the outside of the wheel and took half the length. This will give you a piece somewhat longer than you need, as the steel will lengthen as you work it. I heated each piece and worked it with a hammer on an anvil to give it the appearance of hand-wrought iron. I also worked it to a profile similar to the arc of the wheel. After it cooled I cold-worked it to match the arc as closely as I could get it. I then marked off where I wanted the holes for the nails and drilled them on a drill press. You will probably need to cut the end off one strake, as they will be a bit longer than your original measurement. The strake ends are held by two nails, with a single line of nails down the center.
Part V: Final Bits and Lessons Learned
Because the wheel uses wood-on-wood bearings, and because I used cheap, nasty stud lumber, I chose to stabilize the wood with a few coats of linseed oil.
To provide some lubrication for the wheel bearings, I worked linseed oil and beeswax into the contact surfaces. In period I assume they would have used tallow or animal grease of some kind, but given that this barrow will spend most of its time in my basement or truck, I chose something that wasn't going to go rancid and rub off.
A possible enhancement will be the addition of short legs. When not in use, the barrow sits with the back edge of the bottom resting on the ground. The Weald and Downland example included short legs to elevate the box entirely off the ground. This would also make for less of a stoop when picking up the barrow, and keep the bottom from being in constant contact with wet ground.
A wheel barrow in the Luttrel Psalter shows a man with a leather strap across his shoulders, with either end fixed to the barrow handles.
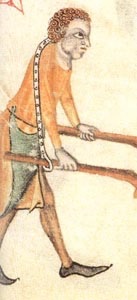
After having used my barrow a bit, I found that the strap would be a useful addition, so I made one. I found that without it, when I needed a hand, my only choice was to set the barrow down.
For another take on the same project, see Charles Oakley's article here:
http://www.medievalwood.org/charles/wheelbarrow.html
While I based much of my design on other sources, I'm sure some ideas, such as using half-laps for the wheel, came from his inspiration.
Here's another variation from Steven Roe, made from ash and oak. Note he used an eight-spoken wheel with a faceted hub, a larger box, a somewhat smaller axle, and six tusk tenons per side.
My thanks also to Karen Larsdatter, whose tenacious research always yields the most useful bits of knowledge.
Copyright 2009, Thomas Rettie.